Meta Training Academy - Setting Up Your Business Portfolio
If you’re a small business owner, you know that running ads on Facebook and Instagram can feel like a necessary but often confusing part of your marketing. You might be boosting posts or setting up campaigns and getting errors, but are you confident that you’re building on a solid foundation?
In 2025, simply running ads isn’t enough. The success of your campaigns, the security of your accounts, and your ability to scale depend entirely on a professional setup that most businesses overlook. This isn’t just a “best practice”; it’s a requirement for competing effectively. An improper setup is the root cause of the most common and costly problems, from getting locked out of your accounts to wasting money on poorly optimized ads.
This guide will walk you through building that rock-solid foundation. We’ll cover how to create and secure your business’s central hub on Meta, manage your assets correctly, and set yourself up for long-term success.
Section 1: Getting Started: The Core of Your Meta Setup
Why Your Foundational Setup is Everything
The days of getting by with a casual approach to Meta ads are over. The platform’s advanced tools, like Advantage+ campaigns, now handle much of the manual work, shifting the focus to your strategic setup. Think of it this way: your primary job is no longer just tweaking individual ads but building and managing the infrastructure that allows Meta’s powerful automation to work for you.
A proper setup protects you from security risks, prevents you from losing access to your pages or data, and unlocks the most powerful advertising features. A professional Business Manager setup is not optional—it’s a required step for any serious business.
Business Suite vs. Business Portfolio: What's the Difference?
One of the biggest points of confusion is the difference between the Meta Business Suite and the Meta Business Portfolio. Understanding their distinct roles is the first step to getting organized.
This is the foundational, backend hub for your entire business on Meta. Think of it as the secure vault where you establish ownership of your assets (like your page and ad account), manage security settings, assign roles to your team, and connect with partners like other brands and external ad managers. All the critical, one-time setup tasks happen here.
This is your day-to-day, front-end dashboard. It’s where you’ll manage your social media presence by scheduling posts, responding to comments and messages in a unified inbox, and viewing performance analytics.
The key takeaway is that the Meta Business Suite is a user-friendly layer built on top of the Meta Business Portfolio’s essential foundation. Relying only on the Suite without correctly configuring the Portfolio is a common mistake that leaves your business vulnerable and limited.
Core Architectural Components
To build your advertising “house” on Meta, you need to know the bricks. Here are the core pieces you’ll be organizing:
- Core Assets: These are the digital properties you own. This includes your Facebook page, Instagram professional account, Threads profile, WhatsApp business account, the ad accounts you use for campaigns, and your datasets (which have replaced the Meta pixel) for tracking data.
- People & Partners: These are the users you grant access to. People are your internal team members. Partners are external companies, like an ads manager or agency you hire to run your ads.
Section 2: The Central Vault: Creating & Securing Your Meta Business Portfolio
This is the most critical part of the process. Your Business Portfolio is the container for everything, so let’s build it correctly.
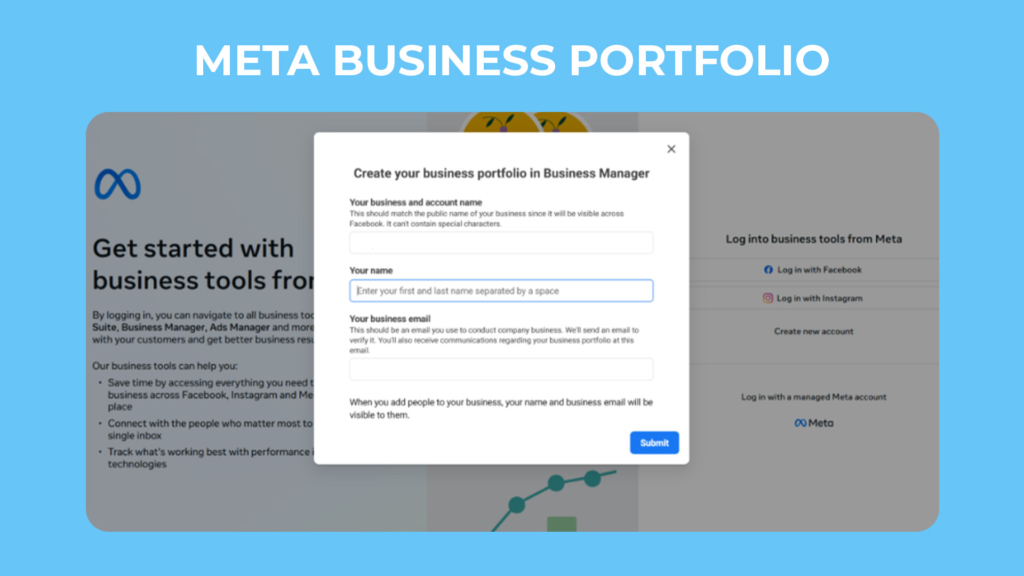
Step-by-Step: Creating Your Business Portfolio
1. Get Started: Go to business.facebook.com/overview. You’ll need to use your personal Facebook profile to log in, but don’t worry—this is purely for identity verification. Your personal information won’t be shared with your business colleagues. Keep in mind you can only create two Business Portfolios per personal profile in your lifetime, so it’s important to do this correctly.
2. Create Your Account: Click “Create an Account.” Enter your official, legal business name, your full name, and your business email address. Using a professional email is crucial for verification.
3. Verify Your Email: Meta will send a verification link to the email you provided. You must click this link to activate your Business Portfolio.
4. Fill Out Your Business Info: This is a step many people skip, but it’s vital. Go to “Business Info” within your Business Settings and meticulously fill in every detail: your legal business name, full physical address, business phone number, and website. This information must perfectly match your legal documents for the verification process later.
The Verification Gauntlet: Why You Must Verify Your Business
Business verification is how Meta confirms you are a legitimate business. For any serious advertiser in 2025, this is not optional. Verification unlocks access to advanced features, increases your spending limits, and is often required to resolve any issues with your ad accounts. It’s how you build trust with Meta.
How to Get Verified:
1. Go to Business Settings and click on the Security Center tab.
2. Click “Start Verification.” If this button is grayed out, it’s almost always because you haven’t completely filled out the “Business Info” section.
3. Enter your business details exactly as they appear on your legal documents. Even a small typo can cause a rejection.
4. Upload the required documents to prove your business name and address or phone number.
5. Choose how you want to receive a verification code (email and domain verification are common choices).
6. Enter the code to complete the process. The review can take anywhere from a few minutes to several days.
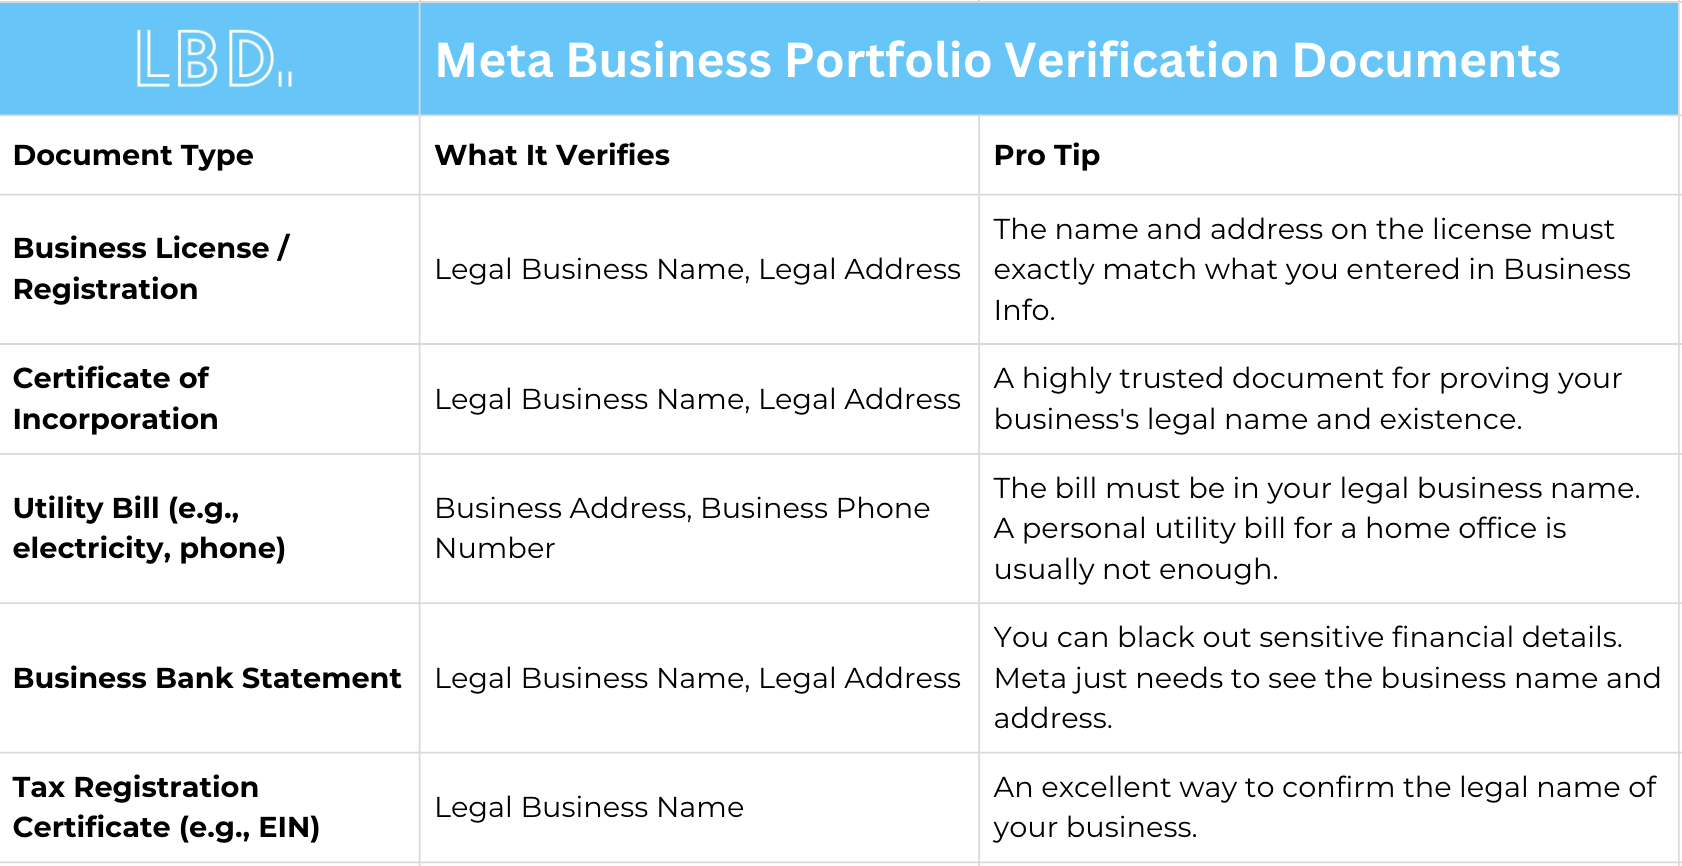
A common reason for failure is submitting documents that don’t match the information you entered. Use this table as a guide:
Your Security Posture: Essential Safeguards
Protecting your Business Portfolio is just as important as protecting your bank account. Implement these two safeguards from day one.
- Two-Factor Authentication (2FA): This security feature requires a second form of verification (like a code sent to your phone) when you log in from a new device. Meta mandates 2FA for all admins and advertisers. The best practice is to go to the Security Center and set the 2FA requirement to "Required for Everyone" immediately.
- Add a Backup Admin: A single point of failure is a huge risk. If you are the only admin and you lose access to your Facebook account, you could be permanently locked out of your business page, ad account, and all your data. To prevent this, you must assign "Full Control" (Admin) permissions to at least one other trusted person in your business.
Section 3: The Hierarchy of Control: Managing Access for Your Team and Agency
People vs. Partners: The Core Concept
You can grant access to your business assets in two ways, and it’s crucial to use the right one for the right situation.
People:
This is for your internal team members—the employees of your company. You invite them using their work email addresses, and they are added directly to your Business Portfolio. You then give them access to the specific assets they need to do their jobs.
Partners:
This is for external organizations, like a marketing agency or a consultant you’ve hired. They should have their own Business Portfolio. Instead of adding their employees to your portfolio, you grant access from your Portfolio to theirs.
This distinction is the key to security and proper ownership. As a golden rule, you must always own your own assets (page, ad account, pixel) within your own Business Portfolio. You then grant partner access to your agency or consultant. An agency or consultant should never create your Facebook page or ad account in their own portfolio.
Assigning Internal Access: A Look at "People" Roles
To add your team members, go to Business Settings > Users > People and click “Invite people.” You’ll assign permissions on two levels.
Portfolio-Level Roles:
- Full Control (Admin): This role has complete control over everything. Admins can add or remove users, manage all assets and billing, and even delete the portfolio. Reserve this for a very small number of trusted or senior employees.
- Partial Access (Employee): This is the standard role for most team members. They have no permissions by default and can only work on the specific assets you assign to them. This is the safest option.
- Advanced Options (Financial Roles): You can also assign specific financial roles, like a Finance Analyst (who can view transactions) or a Finance Editor (who can also manage payment methods).
Asset-Level Assignment:
After setting the main role, you must then assign the person to the specific assets they need. For your Facebook page, for example, you can grant them permission to “Create Content” or “Respond to Messages” without giving them full control.
Collaborating with Agencies or Consultants: The "Partners" Framework
Using the Partner framework is the professional and secure way to work with an external agency or consultant.
How to Grant Partner Access:
1. Go to Business Settings > Users > Partners.
2. Click “Add” and choose “Give a partner access to your assets.”
3. You will need your partner’s Business ID. Your agency or consultant must provide this to you. They can find it in the “Business Info” section of their own Business Portfolio.
4. Enter the ID, and you will see a list of your assets. Select the page, ad account, and other assets you want to share and assign them a role for each one.
5. The partner will then accept the request and can assign their own team members to work on your assets from within their own secure portfolio. This keeps your business secure and reduces your administrative burden.
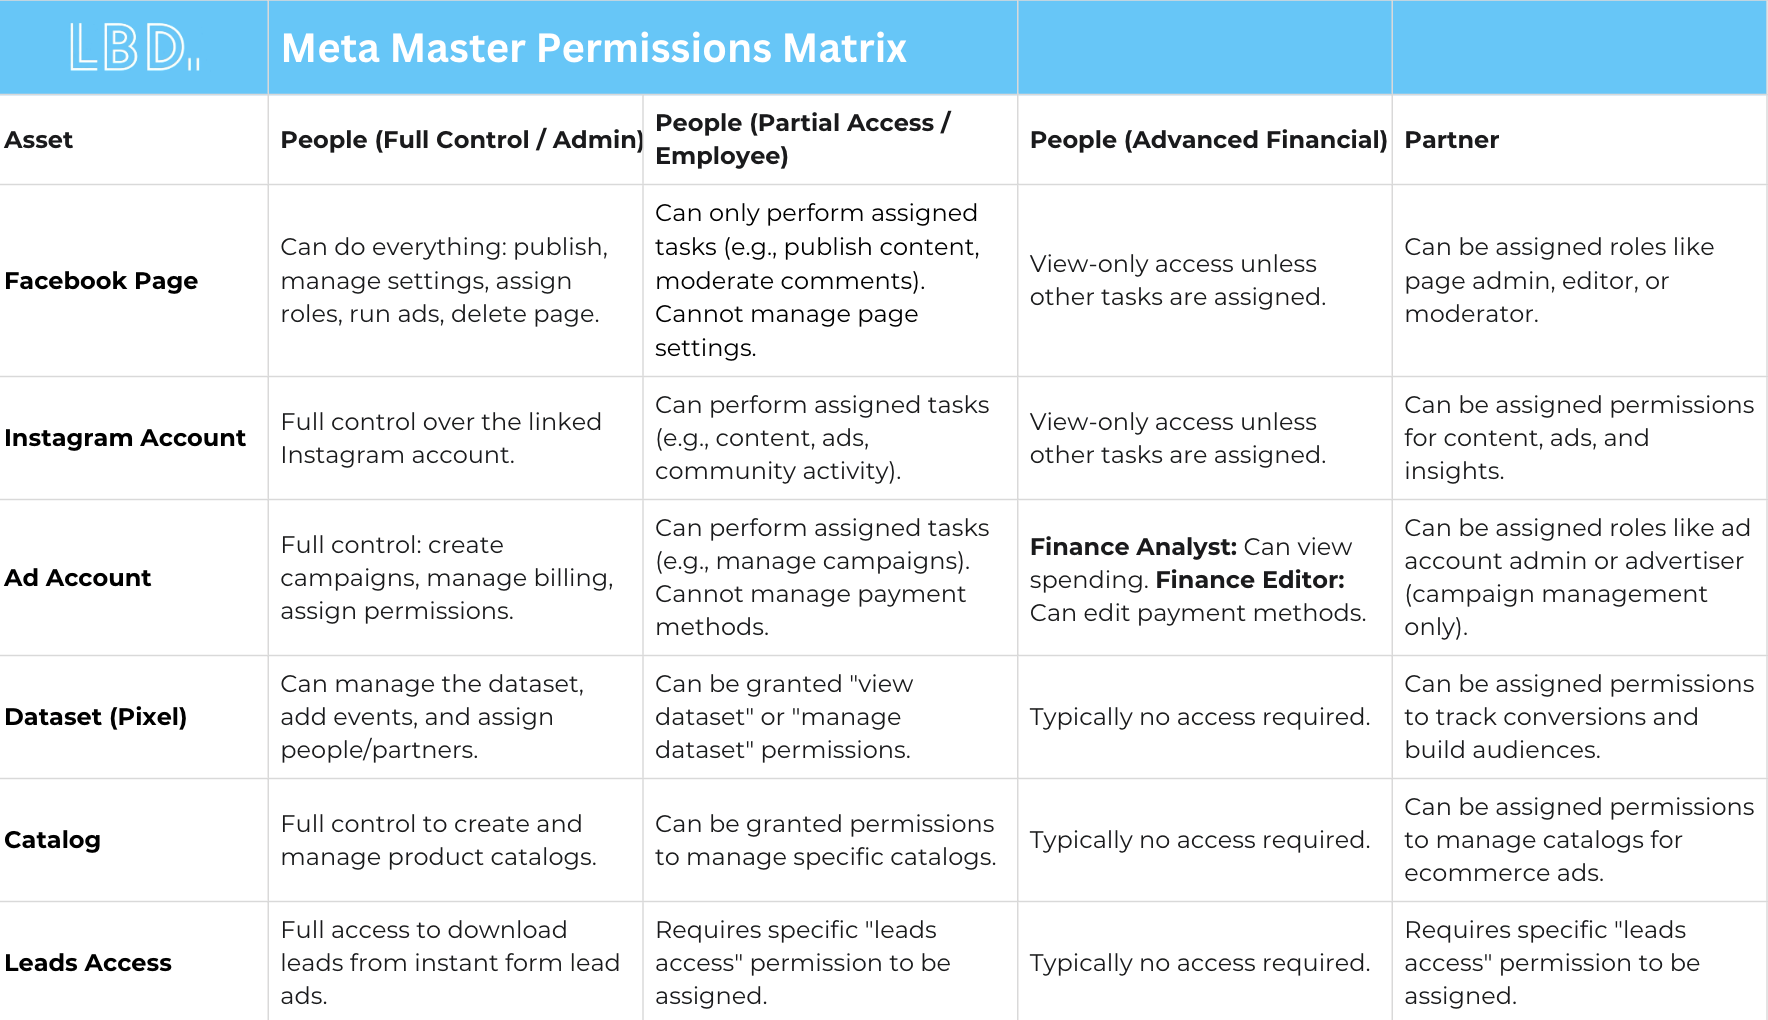
Master Permissions Matrix: A Quick Guide for People vs. Partners
Use this table as a quick reference for assigning the right permissions.
Section 4: Asset Configuration: Connecting Your Digital Footprint
With your Portfolio created and secured, it’s time to add your assets. You’ll do this in Business Settings > Accounts.
Facebook Page: Your Primary Identity
Your Facebook Page is the core of your presence. In the “Pages” section, you will choose “Add a Page” to claim an existing page that you own. This action permanently moves the page under the ownership of your Business Portfolio, which is exactly what you want.
Instagram & Threads: Your Visual and Conversational Fronts
Connecting Instagram:
Before you start, make sure your Instagram account is a Business or Creator profile (you can change this in the Instagram app settings). Then, go to Business Settings > Accounts > Instagram Accounts, click “Add,” and log in to your Instagram account to connect it.
Understanding the Threads Connection:
A Threads profile is not a separate asset you connect. Your Threads profile is an extension of your Instagram account. When you connect your Instagram account to your Business Portfolio, its associated Threads profile comes with it automatically. There is no separate “Connect Threads” button. This means your Instagram and Threads strategies are linked, and ads for Threads are managed as a placement option within ads manager, using the identity of your connected Instagram account.
WhatsApp Business: Your Direct Communication Channel
Meta offers two WhatsApp products. For most small businesses, the free WhatsApp Business App is sufficient. You can link it to your Facebook Page to add a “Message on WhatsApp” button. For larger businesses needing automation, the WhatsApp Business Platform (API) is the solution, and it requires a verified Business Portfolio to access.
Ad Accounts: The Engine of Your Campaigns
Your Meta ad account is where you create, manage, and pay for all your advertising.
How to Create and Set Up Your Ad Account:
1. Go to Business Settings > Accounts > Ad Accounts and click “Add,” then select “Create a New Ad Account.”
2. You will be asked to set the Time Zone and Currency. This is a critical step. These settings are permanent and can never be changed. Getting this wrong will cause major billing and reporting problems.
3. Once the account is created, add a valid Payment Method, like a business credit card.
Be aware that all new ad accounts start with a low daily spending limit (e.g., $50/day). This limit will increase automatically as you spend your budget consistently and follow Meta’s rules.
The Meta Pixel & Conversions API: Your Data Foundation
Good data is the key to good advertising. In 2025, your data foundation relies on two tools working together: the Meta Pixel and the Conversions API (CAPI).
Creation and Setup:
The “Meta Pixel” is now part of a larger container called a Dataset. To create one, go to Business Settings > Data Sources > Datasets and click “Add.” Once created, you must assign the Dataset to your Ad Account so it can be used for campaign optimization.
Implementation Best Practices:
- First-Party Cookies: When setting up your Pixel, make sure you enable the use of first-party cookies. This helps your pixel track data more reliably as browsers phase out third-party cookies.
- Conversions API (CAPI) is a Must: The pixel is a browser-based tool, which means it can be blocked by ad blockers or affected by privacy updates. Conversions API is a server-side tool that sends data directly from your website's server to Meta. A modern setup uses both the pixel and CAPI. This dual-tracking approach gives you a more complete and reliable data stream, which is essential for accurate measurement and powerful ad optimization.
Section 5: The Operational Hub: Navigating the Meta Business Suite
Once your foundation is built in the Business Portfolio, you’ll spend most of your time in the Meta Business Suite for daily management.
Your Unified Dashboard
The Business Suite is designed to streamline your most common tasks. Key sections include:
- Planner: A visual content calendar where you can schedule posts and stories for both Facebook and Instagram.
- Insights: A single place to see performance data for both your Facebook Page and Instagram profile, including reach, engagement, and audience demographics.
- Unified Inbox: This is perhaps the most powerful feature. It brings all your messages and comments from Facebook Messenger and Instagram Direct into one consolidated inbox, so you can respond to everyone without switching between apps. You can even set up simple automations, like instant replies to new messages.
Section 6: Conclusion & The Foundational Setup Checklist (2025)
The Meta advertising ecosystem of 2025 demands a strategic, structured, and security-conscious approach. The era of casual, disconnected management is over, replaced by the necessity of a centralized and properly configured Meta Business Portfolio. This foundational hub is not merely an administrative tool but the core architecture that enables security, collaborative efficiency, and access to the platform’s most advanced advertising and data-tracking capabilities.
The core principles for success are clear:
1. Centralize Ownership: All business assets must be owned within a single, verified Business Portfolio to ensure legal control and operational continuity.
2. Enforce Security: Implement mandatory two-factor authentication for all users and maintain at least two admins to prevent catastrophic lockouts.
3. Use Least Privilege: Grant permissions meticulously, using the “Partial Access” role for internal staff and the secure “Partner” framework for external agencies or consultants.
4. Build a Resilient Data Foundation: A dual implementation of the Meta Pixel (within a Dataset) and the Conversions API is the modern standard for robust data collection.
5. Distinguish Between Interfaces: Understand that the Business Portfolio is for architectural setup, while the Business Suite is for daily operational management.
By adhering to these principles and following the detailed procedures outlined in this report, businesses can establish a foundation that is not only compliant with Meta’s requirements but is also built to scale, adapt, and succeed in the competitive digital landscape.
The Definitive Meta Ads Foundation Checklist (2025)
Use this checklist to walk through the process and ensure you haven’t missed a step.
